I have a little shelf by the front door that I like to decorate for the seasons or holidays. This one is self-explanatory. The numbers are paper mache from Hobby Lobby. I spray painted them gold then glued the patterned paper on them.
The New Year printable (in the black frame) is from eighteen25 blog.
The "do dad" is a Christmas ornament that was originally purple. I found it on after Christmas clearance at Michael's for 80 cents. I sprayed it gold.
Happy New Year!!Pin It
Showing posts with label craft ideas. Show all posts
Saturday, January 09, 2016
Thursday, December 17, 2015
Some Christmas crafting
I enjoy making Christmas-themed crafts. I usually make something new every year. This year I made a shadow box nativity and a bunch of pom pom trees. I have some other crafts that are not completed, but that's OK. :) Crafting is a great activity to keep my sanity while the 3rd football game of the day is on TV.
The pom pom trees was an idea I found in Creatively Christmas - a book I checked out from my library.
These trees are very easy to make.
Directions:
- paint the paper mache trees white with acrylic paint. The trees came from Hobby Lobby.
- glue the pom poms on. I used white Tacky Glue. Leave some spaces for the jingle bells. You will need approx. 150 pom poms no matter what size you use.
- glue on the jingle bells. You will need approx. 40.
The shadow box nativity was an idea that I found at Ben Franklin craft store in Monroe.
The figures are all buttons. They are made by Dress it Up. I found some of the buttons at Hobby Lobby and some at Ben Franklin. The shadow box came from Ben Franklin. The background is starry night scrapbook paper. If you make this, be sure to cut the shanks off the backs of the buttons. I used E6000 glue for this project and spanish moss for the "hay." My hubby wants me to add LED lights to this.
This paper wreath hangs in my kitchen.
I made it last year using a kit from Paper Source - a store in Bellevue and University Village.
Pin It
![]() |
| In the background is my new accent chair. It matches my robins egg blue wall really well! |
These trees are very easy to make.
Directions:
- paint the paper mache trees white with acrylic paint. The trees came from Hobby Lobby.
- glue the pom poms on. I used white Tacky Glue. Leave some spaces for the jingle bells. You will need approx. 150 pom poms no matter what size you use.
- glue on the jingle bells. You will need approx. 40.
The shadow box nativity was an idea that I found at Ben Franklin craft store in Monroe.
The figures are all buttons. They are made by Dress it Up. I found some of the buttons at Hobby Lobby and some at Ben Franklin. The shadow box came from Ben Franklin. The background is starry night scrapbook paper. If you make this, be sure to cut the shanks off the backs of the buttons. I used E6000 glue for this project and spanish moss for the "hay." My hubby wants me to add LED lights to this.
This paper wreath hangs in my kitchen.
I made it last year using a kit from Paper Source - a store in Bellevue and University Village.
Pin It
Saturday, October 24, 2015
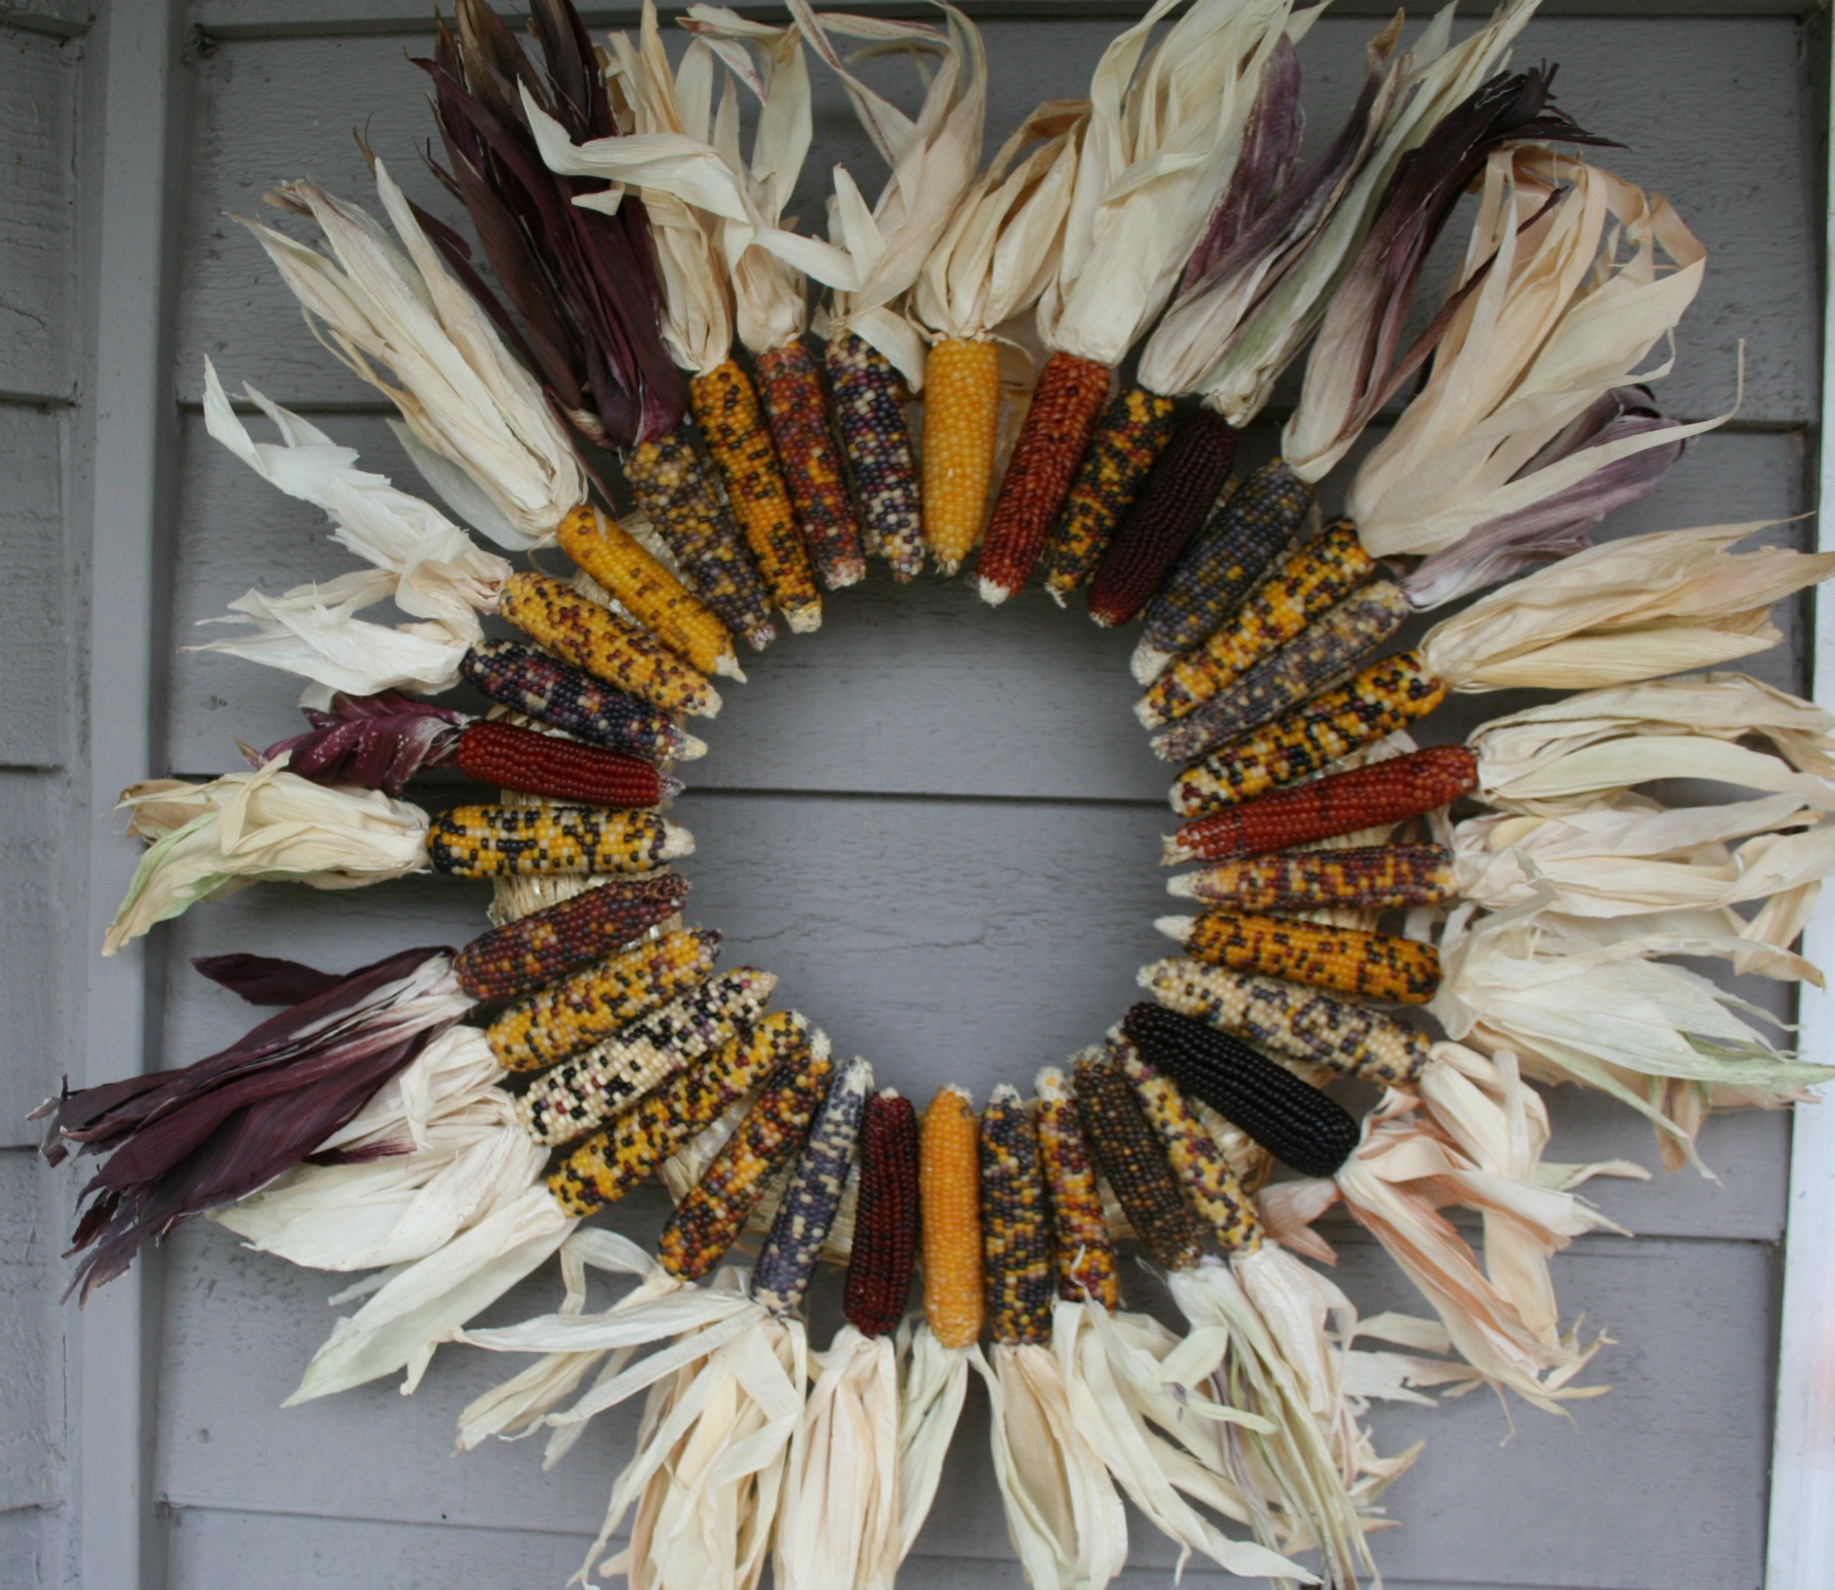
Indian Corn Wreath
I haven't made a wreath in a while. When I was changing my decor for fall, I realized that I needed a fall wreath for outside. I decided to make an Indian corn wreath.
Supplies needed:
- straw wreath form
- Indian corn (real, not faux) - these come in various sizes. I picked the medium ones. Fred Meyer had a large quantity, which I needed. I used 34.
- glue gun with lots of glue sticks.
I'm pretty happy with the outcome. Even my 12 year old said it was cool, which is high praise. :)
Pin It
Supplies needed:
- straw wreath form
- Indian corn (real, not faux) - these come in various sizes. I picked the medium ones. Fred Meyer had a large quantity, which I needed. I used 34.
- glue gun with lots of glue sticks.
I'm pretty happy with the outcome. Even my 12 year old said it was cool, which is high praise. :)
Pin It
Thursday, July 02, 2015
Whose Broad Strips and Bright Stars......
I had thought of using a stencil to paint on the stars but I instead bought these small wood stars
and painted them AND sanded them for the distressed look that I like. I used wood glue to glue them onto the plaque. I did intend to put 50 on but I ran out of patience and room. I used Folk Art acrylic paint.
There are 37 stars on my flag and I'm OK with that. Artistic license.
Lest any of my Canadian friends take issue with me painting an American flag, remember that half of my family is made up of American citizens. :)
Pin It
Friday, January 30, 2015
Seahawks Mantle
Since January doesn't have a holiday (other than Martin Luther King Jr. day), it is a challenge to come up with ideas for a January mantle. We don't really get wintry weather here so that idea is out.
Thankfully, I found inspiration from my team, the Seattle Seahawks. I'm glad that I like their colours, What if we lived in Wisconsin? I'd have to embrace mustard yellow. Ugg. This mantle has been the works for a while. A bit of a challenge, but I'm up for it.
I am still working on painting a sign but I probably won't finish it before the big game on Sunday.
So, without further ado, here it is:
Details. Click on photo to see it better:
Tissue Paper Pom Poms. I made them. They are so simple! I wish I'd discovered them sooner. I found great instructions here.
Pennant. It cost me all of four dollars at a sports store at the mall. I got the last one they had in stock!
Paper Hawks (Richard Sherman and Russell Wilson). Printables from the Seattle Times.
Paper Seahawks bus - printable from Bellingham Herald.
Little Marshawn Lynch. I found it here. Tough to put together!
Seahawks printable. Found by googling.
Go Hawks Banner. Ben Franklin craft store in Redmond had the sample and the instructions. I used their die cut machine to cut out the letters, triangles and stars.
Pin It
Thankfully, I found inspiration from my team, the Seattle Seahawks. I'm glad that I like their colours, What if we lived in Wisconsin? I'd have to embrace mustard yellow. Ugg. This mantle has been the works for a while. A bit of a challenge, but I'm up for it.
I am still working on painting a sign but I probably won't finish it before the big game on Sunday.
So, without further ado, here it is:
Details. Click on photo to see it better:
Tissue Paper Pom Poms. I made them. They are so simple! I wish I'd discovered them sooner. I found great instructions here.
Pennant. It cost me all of four dollars at a sports store at the mall. I got the last one they had in stock!
Paper Hawks (Richard Sherman and Russell Wilson). Printables from the Seattle Times.
Paper Seahawks bus - printable from Bellingham Herald.
Little Marshawn Lynch. I found it here. Tough to put together!
Seahawks printable. Found by googling.
Go Hawks Banner. Ben Franklin craft store in Redmond had the sample and the instructions. I used their die cut machine to cut out the letters, triangles and stars.
Pin It
Friday, January 02, 2015
New Year shelf
I like to change out my little shelf by the front door for each season or holiday. Since it is a new year, time for a New Year shelf.
The numbers are paper mache, from Hobby Lobby. I painted them and then glued scrapbook paper on top. The last step was a coat of mod podge over top.
This little vintage card was found at an antique mall.
Yesterday on New Year's Day we went to Tacoma. J and the boys went to the Model Train Festival at the Washington History Museum. I went antiquing. I found a View Master! I have been looking for one since summer.Pin It
The numbers are paper mache, from Hobby Lobby. I painted them and then glued scrapbook paper on top. The last step was a coat of mod podge over top.
This little vintage card was found at an antique mall.
Yesterday on New Year's Day we went to Tacoma. J and the boys went to the Model Train Festival at the Washington History Museum. I went antiquing. I found a View Master! I have been looking for one since summer.Pin It
Wednesday, October 29, 2014
Paperback Fruit
![]() |
| pumpkin, eggplant (purple), green apple, red apple, pear. |
I followed a great tutorial for making shaped books at this blog. One tip is that the book has to be at least 100 pages. If you are wondering where the books came from, most were found at the used section of my public library, for 25 cents a piece!
Pin It
Thursday, April 24, 2014
Hydrangea Easter Eggs
Yes, I know that Easter has passed. :) This is another part of my spring mantle. It feels good to finish a project that I had in the works for some time. The original idea came from this blog.
Supplies needed:
- Martha Stewart hydrangea punch - available at Michael's.
- paper in light shades of purple, blue, green, and pink.
- 200 to 300 pearl pins (for 2 eggs)
- styrofoam eggs
- patience
Directions:
1. Punch out lots of flowers.
2. Layer two and push a pin through them.
3. Push them into the eggs. I like the random look.
Pretty simple. I only poked myself twice. :)
I put them on top of some milk glass containers from my collection. I don't think I need to take them down now that Easter has passed. They are pretty subtle.Pin It
Supplies needed:
- Martha Stewart hydrangea punch - available at Michael's.
- paper in light shades of purple, blue, green, and pink.
- 200 to 300 pearl pins (for 2 eggs)
- styrofoam eggs
- patience
Directions:
1. Punch out lots of flowers.
2. Layer two and push a pin through them.
3. Push them into the eggs. I like the random look.
Pretty simple. I only poked myself twice. :)
I put them on top of some milk glass containers from my collection. I don't think I need to take them down now that Easter has passed. They are pretty subtle.Pin It
Tuesday, April 08, 2014
Pink and Green Fabric Garland for Spring
This was NOT one of those quick and easy projects. Far from it! I actually started making this garland a year ago. I did stop for a long time, though. :)
I found the inspiration at Two Shades of Pink - flowers and leaf vine garland.
I made the flowers according to her directions (a year ago!), however, I found them too floppy. I decided to use Heat n Bond to make the fabric two layered and then cut out the petals. This made much sturdier flowers. I also made way more green leaves than in the original. I don't like to see bare string/ribbon/jute in a banner. I love the fullness of this garland.
Close up view:
Materials needed - if you are crazy enough to make one of these!
Here is a view of the entire banner. Click to enlarge.
I think this project may have pushed me over the edge to getting a Silhouette die-cutting machine.
I spent WAY too much time tracing and cutting out fabric!Pin It
I found the inspiration at Two Shades of Pink - flowers and leaf vine garland.
I made the flowers according to her directions (a year ago!), however, I found them too floppy. I decided to use Heat n Bond to make the fabric two layered and then cut out the petals. This made much sturdier flowers. I also made way more green leaves than in the original. I don't like to see bare string/ribbon/jute in a banner. I love the fullness of this garland.
Close up view:
Materials needed - if you are crazy enough to make one of these!
- pink fabric - maybe a yard?
- green fabric - two different patterns
- jute
- Heat n Bond
- felt for the backs of the flowers
- floral wire
- buttons
- glue gun.
Here is a view of the entire banner. Click to enlarge.
I think this project may have pushed me over the edge to getting a Silhouette die-cutting machine.
I spent WAY too much time tracing and cutting out fabric!Pin It
Sunday, March 30, 2014
Tie One On - Spring Garland
I started creating my Spring mantle but it needed something more. I decided to make a green rag garland. I made one before with a Christmas theme but that was fabric tied on a string of lights.
I bought 6 fat quarters (2 of each design) and a 1/4 yard of another fabric in various shades of green. I cut 1 3/4 inch by 9 inch strips. I used bakers twine to tie the fabric onto. Here is the finished project.
And a close up.
I'll be ready to share my Spring mantle soon.Pin It
I bought 6 fat quarters (2 of each design) and a 1/4 yard of another fabric in various shades of green. I cut 1 3/4 inch by 9 inch strips. I used bakers twine to tie the fabric onto. Here is the finished project.
And a close up.
I'll be ready to share my Spring mantle soon.Pin It
Thursday, February 13, 2014
Valentine's Day Mantle
Here is a close up of the love printable I found online.
It is 1 Corinthians 13. I found the red, pink, and white candies in the bulk section at Winco. The frame is from my stash of thrift store finds. I painted it white.
For the big X and O, I got the paper mache letters at JoAnns. I put mod podge on them and dumped a LOT of red glitter on them. This isn't for the faint of heart. You will end up covered in glitter and it will end up in crazy places. The valentines are reproductions of vintage Valentines from this book: Vintage Valentines (Press Out Book)
The garland I made last year. It is made with playing cards and various ribbon.Pin It
Labels:
craft ideas,
home decor,
mantles,
seasonal,
Valentine's Day
Tuesday, February 11, 2014
Parade of Nations
I'm a bit slow to get into the Olympics this time around. We have watched snowboarding and some figure skating so far. I recorded the Opening Ceremonies (since we were out that night) and I hope to watch it soon. I did get into the spirit enough to make this banner a few days ago.
I found the flags printable here. There are 100 flags. Yes, I cut them all out. I was watching Netflix while I did it. I glued them onto red baker's twine. Here is a close up of the banner. The names of the country are on the back of each flag. It is educational!
My pastor mentioned in church on Sunday that his favourite part of the Olympics is the Parade of Nations. I agree. There is something inspiring about seeing all those people who are so diverse in language, culture, and religion all coming together for a common goal and purpose. How rare it is to see that. My pastor said that he looks forward to the parade of nations in heaven when God will gather worshipers from among the nations. I too long for that day.
I found the flags printable here. There are 100 flags. Yes, I cut them all out. I was watching Netflix while I did it. I glued them onto red baker's twine. Here is a close up of the banner. The names of the country are on the back of each flag. It is educational!
My pastor mentioned in church on Sunday that his favourite part of the Olympics is the Parade of Nations. I agree. There is something inspiring about seeing all those people who are so diverse in language, culture, and religion all coming together for a common goal and purpose. How rare it is to see that. My pastor said that he looks forward to the parade of nations in heaven when God will gather worshipers from among the nations. I too long for that day.
After this I looked, and there before me was a great multitude that no one could count, from every nation, tribe, people and language, standing before the throne and before the Lamb.
They were wearing white robes and were holding palm
branches in their hands.
Revelation 7:9
Pin It
Monday, December 23, 2013
Christmas Decorations & Our Christmas Tree
I thought it would be fun to share some of my decorations,
especially for my mom who can't be with us this year for Christmas. :(
I love glitter churches. This is my medium sized one - I have three.
This one came from TJ Maxx or Marshalls.
I took this photo on our snow day.
One decoration that is new this year is my rag garland.
It was very easy to make. I cut strips of fabric - 1 1/2 inches wide by 6 inches long. Four different fabrics. I used about a half a yard of each fabric.The fabric is tied onto a string of 50 lights. Here is a close up view.
On my mantle, I have a lighted garland that I got from an after Christmas sale at Molbaks last December 26th. I actually forgot about it so it was a nice surprise to pull it out of a box and use it for the first time.
Here's my mantle with my Christmas sign (from Ruffles & Rust 2012), my garland,
and our velvet stockings which now have initials on them.
My little angel amidst my milk glass collection.
I put lights in the kitchen window. I'll leave them up after Christmas. It helps with the dark months of winter. In one corner of my kitchen window I put some lights inside an old milk bottle.
I have this little white tree for more of a "girly" look.
You can see in the background that we now have Christmas cards to fill my memo board.
Here's our Christmas tree. It is a little "skinnier" than usual. It is a Noble Fir.
I ordered our tree this year (a school fundraiser) so I didn't actually pick it out myself.
It wouldn't be Christmas without poinsettias. Here are mine.
Pin It
Tuesday, December 10, 2013
Christmas memo board (tutorial)
I've made a few French memo boards before. One for myself and one for my mom. I thought I'd make one to display Christmas cards and photos we receive.
Materials needed:
- fat quarter of fabric
- canvas - I used 14 by 18 this time but the other memo boards I made were 16 by 20.
Either size will work. You can get a canvas at Michaels/JoAnns/Hobby Lobby and use a coupon!
- brads
- ribbon
- staple gun
Directions:
1. staple fabric to the frame of the canvas (on the back).
2. measure and cut ribbon, one piece at a time.
3. staple the ribbon to the back, in a criss-cross pattern.
4. I used a Swiss army knife to make a small hole in the ribbon and the fabric.
5. insert the brads.
I ran out of ribbon before finishing the project so some of the ribbon is wider and some is narrow. If you have OCD tendencies, you will want to line up the ribbon better than I did. :)
Here is a (bad) photo of the one I made for myself, back in 2007.
The ribbon is sheer which is much more forgiving of any bad alignment.
Now, I just need more cards and letters to fill up my Christmas memo board! The funny/sad thing is that we've receive a grand total of ONE photo so far this year. Come on, people! I guess I can't judge since we haven't sent ours out yet. :)Pin It
Materials needed:
- fat quarter of fabric
- canvas - I used 14 by 18 this time but the other memo boards I made were 16 by 20.
Either size will work. You can get a canvas at Michaels/JoAnns/Hobby Lobby and use a coupon!
- brads
- ribbon
- staple gun
Directions:
1. staple fabric to the frame of the canvas (on the back).
2. measure and cut ribbon, one piece at a time.
3. staple the ribbon to the back, in a criss-cross pattern.
4. I used a Swiss army knife to make a small hole in the ribbon and the fabric.
5. insert the brads.
I ran out of ribbon before finishing the project so some of the ribbon is wider and some is narrow. If you have OCD tendencies, you will want to line up the ribbon better than I did. :)
Here is a (bad) photo of the one I made for myself, back in 2007.
The ribbon is sheer which is much more forgiving of any bad alignment.
Now, I just need more cards and letters to fill up my Christmas memo board! The funny/sad thing is that we've receive a grand total of ONE photo so far this year. Come on, people! I guess I can't judge since we haven't sent ours out yet. :)Pin It
Wednesday, December 04, 2013
Advent Activities
Advent. What is it? Advent is a season of preparation that some Christians observe to prepare their hearts and minds for the coming of Jesus. Advent comes from the Latin word which means coming. I like this quote:
For four weeks, it’s as if we’re re-enacting, remembering the thousands of years God’s people were anticipating and longing for the coming of God’s salvation, for Jesus. - Noel Piper (wife of John Piper)
I made my own advent wreath last year. It was pretty easy. I used a styrofoam form for the base. I added candle holders (from Michaels in the wreath making section). I took apart a thrift store wreath and hot glued fake evergreen branches around the base. The funny thing is that I bought advent candles for it and there were 4 in the package. For some reason I made 5 spaces for candles - that was before I bought the candles. :) There seems to be different numbering methods for the candles. I guess I'll get a white candle for that missing space. I think it is for lighting on December 25th. To be honest, we haven't actually lit the candles yet. I was the one who lit the candle for the 1st Sunday of Advent at church last Sunday.
Lego City Advent Calendar. Yes, I know this has nothing to do with the real meaning of Christmas but the boys love Lego and I got it on sale. Every day they create something - a dog with bones, a fireplace, a man holding hot chocolate, etc.
The Starbucks Advent calendar. I remember driving around trying to find a store that had one back in 2006 when these came out. They were hot sellers. They came with chocolates inside (which I enjoyed). When all the drawers are turned around, a wintry scene is revealed. Back in 2008 or so I printed out a Bible reading for each day along with a little symbol. I found the instructions on a homeschooling blog. Here's a sample.
Each day one of the boys pulls out the slip to read. We've been using it for years but they still enjoy it. They love traditions.
This year (as a family at supper) we are reading through the advent readings found in the Thriving Family magazine published by Focus on the Family. A subscription to the magazine is free upon request. The readings loosely tie in with Adventures in Odyssey which my oldest son LOVES to listen to.
For my personal advent devotions, I'm reading through this new little book by John Piper. It was $5 at Amazon.com. You can't beat that price!Pin It
For four weeks, it’s as if we’re re-enacting, remembering the thousands of years God’s people were anticipating and longing for the coming of God’s salvation, for Jesus. - Noel Piper (wife of John Piper)
I made my own advent wreath last year. It was pretty easy. I used a styrofoam form for the base. I added candle holders (from Michaels in the wreath making section). I took apart a thrift store wreath and hot glued fake evergreen branches around the base. The funny thing is that I bought advent candles for it and there were 4 in the package. For some reason I made 5 spaces for candles - that was before I bought the candles. :) There seems to be different numbering methods for the candles. I guess I'll get a white candle for that missing space. I think it is for lighting on December 25th. To be honest, we haven't actually lit the candles yet. I was the one who lit the candle for the 1st Sunday of Advent at church last Sunday.
Lego City Advent Calendar. Yes, I know this has nothing to do with the real meaning of Christmas but the boys love Lego and I got it on sale. Every day they create something - a dog with bones, a fireplace, a man holding hot chocolate, etc.
The Starbucks Advent calendar. I remember driving around trying to find a store that had one back in 2006 when these came out. They were hot sellers. They came with chocolates inside (which I enjoyed). When all the drawers are turned around, a wintry scene is revealed. Back in 2008 or so I printed out a Bible reading for each day along with a little symbol. I found the instructions on a homeschooling blog. Here's a sample.
Each day one of the boys pulls out the slip to read. We've been using it for years but they still enjoy it. They love traditions.
This year (as a family at supper) we are reading through the advent readings found in the Thriving Family magazine published by Focus on the Family. A subscription to the magazine is free upon request. The readings loosely tie in with Adventures in Odyssey which my oldest son LOVES to listen to.
For my personal advent devotions, I'm reading through this new little book by John Piper. It was $5 at Amazon.com. You can't beat that price!Pin It
Labels:
Christian parenting,
Christmas,
craft ideas,
faith,
seasonal
Tuesday, November 26, 2013
Button, Button, Who's Got the Button?
When the days get shorter and gardening season ends, I like to get crafty. It is good to have some projects on the go. This one I finished up a while back. I have a big button collection and I've made headbands with them. I wrote about that on my blog.
I was at a craft fair back in October and saw button bracelets selling for $30 and I thought, I could make that myself for a lot cheaper!
Here's a simple tutorial for a button bracelet.
Materials list:
- chain (gold or silver)
- side cutter tool
- loop closing pliers
- buttons
- jump rings (gold or silver)
- clasp
Directions:
1. cut the chain to the correct length with a side cutter.
2. attach the clasp.
3. open up the jump rings
4. loop the button onto a jump ring
5. connect to the chain.
6. close the jump ring with pliers.
7. repeat until the chain is full.Pin It
I was at a craft fair back in October and saw button bracelets selling for $30 and I thought, I could make that myself for a lot cheaper!
Here's a simple tutorial for a button bracelet.
Materials list:
- chain (gold or silver)
- side cutter tool
- loop closing pliers
- buttons
- jump rings (gold or silver)
- clasp
Directions:
1. cut the chain to the correct length with a side cutter.
2. attach the clasp.
3. open up the jump rings
4. loop the button onto a jump ring
5. connect to the chain.
6. close the jump ring with pliers.
7. repeat until the chain is full.Pin It
Monday, March 18, 2013
Memories photo board
I saw this idea at Ben Franklin in Redmond, oh about a month or two ago! I finally completed this simple project.
Materials needed:
- board - this was $17 at Ben Franklin, yes a little pricey but it was so convenient to have it already painted and just the right size.
- clothespins (I found ones that were already painted white but you could paint your own)
- jute/rope
- duct tape
- vinyl word/phrase - this was $3.99 at Ben Franklin. The vendor is Decorating Your Life. Ben Franklin carries lots of phrases and words at the Redmond store and also the store in Monroe.
Instructions:
1. carefully stick the vinyl word on the board (instructions are on the back of the package)
2. wrap the jute around the board. Use duct tape to hold it on.
3. put the clothespins on.
4. put your photos/postcards/tickets on the board and admire.Pin It
Materials needed:
- board - this was $17 at Ben Franklin, yes a little pricey but it was so convenient to have it already painted and just the right size.
- clothespins (I found ones that were already painted white but you could paint your own)
- jute/rope
- duct tape
- vinyl word/phrase - this was $3.99 at Ben Franklin. The vendor is Decorating Your Life. Ben Franklin carries lots of phrases and words at the Redmond store and also the store in Monroe.
Instructions:
1. carefully stick the vinyl word on the board (instructions are on the back of the package)
2. wrap the jute around the board. Use duct tape to hold it on.
3. put the clothespins on.
4. put your photos/postcards/tickets on the board and admire.Pin It
Thursday, February 14, 2013
Classroom Valentine Exchange 2013
Valentine's Day is a big deal for school age kids. They look forward to giving and receiving valentines to their classmates as well as making or decorating boxes. This year was pretty over the top for our family.
My boys both love Minecraft. If you don't know what it is, I won't bore you with the details. It is a very popular computer game. We made a "Steve" box which A loves!
I found minecraft valentines on Etsy made by Little Sketchy Cards. I bought only enough for the boys in his class.
For the girls in the class, my husband came up with an idea. LED lights behind red hearts, held in a styrofoam ball with a magnet on the back.
For my youngest son, we made a tank box, covered in camo duct tape.
The top part even moves. His classmates loved it. I had planned to make these bomb valentines for his classmates
but I quickly realized that this would take FOREVER since he has 23 classmates and the amount of candy required would be incredibly expensive. Those are Rolo candies. We made 3 of them for his best friends and then did these "You're a Star!" valentines (with a Starburst candy attached) for the rest of the class.
My boys both love Minecraft. If you don't know what it is, I won't bore you with the details. It is a very popular computer game. We made a "Steve" box which A loves!
I found minecraft valentines on Etsy made by Little Sketchy Cards. I bought only enough for the boys in his class.
For the girls in the class, my husband came up with an idea. LED lights behind red hearts, held in a styrofoam ball with a magnet on the back.
For my youngest son, we made a tank box, covered in camo duct tape.
The top part even moves. His classmates loved it. I had planned to make these bomb valentines for his classmates
but I quickly realized that this would take FOREVER since he has 23 classmates and the amount of candy required would be incredibly expensive. Those are Rolo candies. We made 3 of them for his best friends and then did these "You're a Star!" valentines (with a Starburst candy attached) for the rest of the class.
We were all up late last night finishing up valentines!
Pin It
Subscribe to:
Posts (Atom)